

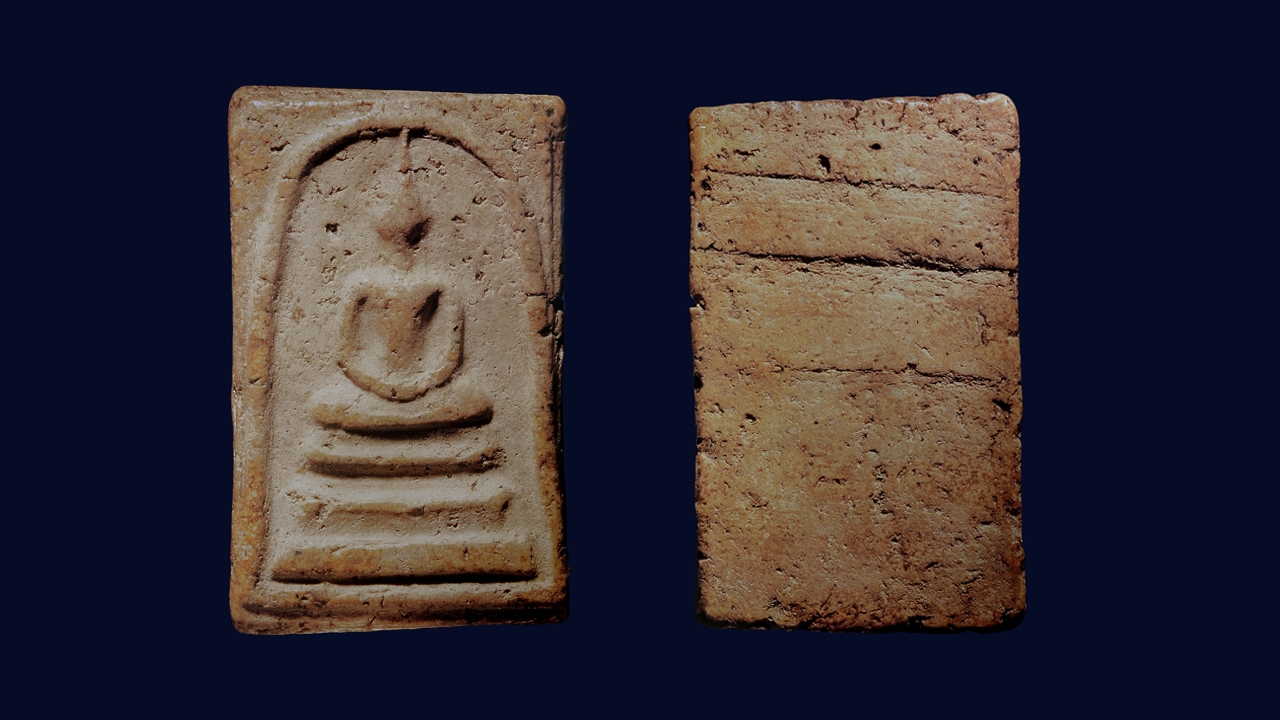
The Large Print Wat Rakang Somdej Buddha has been subdivided into several sub-prints. Triyampawai divided it into six sub-prints, while Nirunam from Precious magazine divided it into four sub-prints. "The Science of Somdej Buddha" It has been presented that, based on various evidence, it is likely that all sub-prints were created from a single print design, or what modern craftsmen call a "drawing." Sometimes, when carving the mold, the craftsman might carve the Buddha's hair longer than usual.This has become a key feature for distinguishing sub-prints.An important observation for sub-print identification. "Hair piercing the archway" Regarding the pieces where the carving "Saem line beneath the lap" is clear,it has become a key identifying featurefor the sub-print known as the “Principal Buddha Print.”
It is interesting how the "Saem" lines found on the Large Print Wat Rakang Somdej Buddha, and also on other Wat Rakang Somdej prints, play an important role in understanding the design background of Somdej Buddha prints by Somdej Phra Phutthachan (Toh Prommarangsi).
Triyampawai classified the throne styles of the Principal Buddha Wat Rakang Somdej Buddha (equivalent to what is commonly called the Large Print today), which bear similarities, into four types as follows:
Standard type – This is the commonly appearing and foundational type for the others...
Saem type – All three bases are thick and raised, with relatively tight spacing between layers. Two thin 'Saem' lines appear as ridges: one between the Buddha's lap and the upper base, serving as Nisithna (a cloth used as a seat cushion for monks and novices to protect against dirt), and another between the upper base and the middle base (the lion base). This second line functions as the 'Bua Luk Kaeo' (a Thai architectural element that visually divides proportions and adds symbolic beauty). These two ridge lines are less sharp than those of the Saem base print but are still distinctly observable.
Paired type - Similar to the Saem type, but the two 'Saem' ridge lines are closer to the base itself (Nisithna near the upper base and Bua Luk Kaeo near the middle base), running parallel to the 'axe edge' line. The three bases are more closely set than in the Saem type, and the base widths are narrower. The lowest base shows paired parallel ridges or 'anti-counterfeit wires' running alongside its edges, similar to the paired base style.
Curved type – The upper and middle bases have a slight curve aligning with the lower edge of the Buddha's lap—characteristic of the curved lap style. The upper base curves more prominently at both ends. The middle base's 'chicken chest' line (or "axe edge" line) slopes gracefully down to meet the lower base, known as "axe edge–lion base" ). The lion base's paw caps curve to accommodate a raised corner acting as a grille, slightly pointed upward, reminiscent of the bow used in Khon and Lakorn Chatri performances.

Considering the above data from Triyampawai, although he identified six sub-prints of the Principal Buddha Wat Rakang Somdej (Large Print)—namely the broad, openwork, elongated, stubby, well-proportioned, and miniature prints (explained several times by Ajarn Prakit Limsakul or Phlay Chumphon in the "Miracle from the Buddha Shelf" column)—some have two 'Saem' lines and some do not. However, the mold carving traces at the corners of the uppermost base and the middle base (lion base) in all sub-prints show a slight upward sharp corner, aligning with the curved ends of the upper 'Saem' line touching the base below on both sides. It is intriguing why the craftsman carved the base corners in this manner.
Referring to the sub-print division by Nirunam into four, beyond sub-print 1 or the Principal Buddha print that clearly shows the 'Saem' line beneath the lap (the Nisithna line), the other three sub-prints, upon examining several master Large Print Wat Rakang Somdej Buddhas, also often show traces of the 'Saem' line beneath the lap. Especially in sub-print 2 or the chest V print, the 'Saem' line beneath the lap is more easily observed than in sub-prints 3 and 4 (chest tubular and hair piercing archway prints). Nirunam mentions that the chest V print also has the 'Saem' line beneath the lap, though not as clear as the very distinct one in sub-print 1, which serves as a key defect for this sub-print identification. Regarding the second 'Saem' line (the Bua Luk Kaeo line) above the middle base or lion base, a similar observation shows that many master Large Print Buddhas exhibit faint traces of this second 'Saem' line above the lion base. Some Somdej Buddha experts say that the trace of this second 'Saem' line is an important authenticity marker.
The Science of Somdej Buddha has presented that although the Large Print Wat Rakang Somdej Buddha has many sub-prints—some divided into over ten sub-print molds—all sub-print blocks likelyderive froma single print design or what modern craftsmen call a "drawing." When carving the mold, sometimes the Buddha's hair is carved longer, or the 'Saem' line beneath the lap is less distinct, making it less visible in some molds. From such evidence, The Science of Somdej Buddha proposes the idea that the Large Print Wat Rakang Somdej likely has "Saem" lines carved in all sub-prints, probably two lines: one beneath the lap and one above the lion base.
"The Science of Somdej Buddha" has also presented a theory on print design evolution, stating that among the standard Wat Rakang Somdej Buddha prints, the craftsman first carved the Saem base print roughly, as a trial by the royal goldsmith. Then followed the more refined lotus bud hair and chedi prints. The large print was the ultimate design, representing a perfect synthesis between ancient Thai art knowledge and Western art influences introduced at the time. The leaf print was a modification from an earlier design. Considering the "Saem line" theory,one can see thatthe Saem base print has two relatively blunt, thick 'Saem' lines (beneath the lap and above the lion base). The lotus bud hair print shows both lines sharply and fluidly integrated into the finely carved mold. The chedi print sometimes shows faint 'Saem' lines. The large print, besides sub-print 1 where the first 'Saem' line is clearly visible, shows faint traces of both lines in many master pieces. Interestingly, examining the uppermost and middle base corners (lion base, visible in all prints), one notices slight upward sharp corners in all Wat Rakang Somdej prints. In some chedi prints, the right lion base corner spreads sideways but still curves upward slightly. These traces lead to a new hypothesis that all five standard prints by Somdej Phra Phutthachan (Toh) were designed with two 'Saem' lines: beneath the lap (Nisithna line) and above the lion base (Bua Luk Kaeo line)."Bua Luk Kaeo"lines in every print style as well.
Although the Large Print Wat Rakang Somdej Buddha has many sub-prints, all mold blocks likely originate from a single design or "drawing". The sometimes overly long hair carving becomes a key identifying defect named "hair piercing the archway." Pieces with clearly carved 'Saem' lines beneath the lap are key markers for the Principal Buddha sub-print. A closer look at the throne style or three-layer base, based on Triyampawai's text,shows that the 'Saem' lines on the Large Print Wat Rakang Somdej Buddha likely number two: the line beneath the lap (Nisithna) and the line above the lion base (Bua Luk Kaeo). These lines probably exist in all sub-print styles,even if some are faint due to shallow carving or mold wear. Referring to the theory of print evolution, it is possible that Somdej Phra Phutthachan (Toh) designed all five standard Wat Rakang Somdej Buddha prints with two 'Saem' lines, the Bua Luk Kaeo line included. This article concludes by summarizing Nirunam's widely accepted criteria for evaluating the Large Print Wat Rakang Somdej Buddha, listing 11 key defects common to all sub-prints and an additional 4 defects specific to sub-print 2, the chest V print, as follows: Defect 1
The outer frame around the Buddha figure has raised lines on all four sides, with the left frame line running down to between the Buddha's elbow and disappearing into the archway line. Defect 2
The right frame line (at the Buddha figure) is raised and runs continuously close to the bottom of the archway line. Defect 3
The glass-house arch line is quite large and raised, resembling a split rattan line. Inside the arch, vertical lines rise from the base. The floor outside the arch slopes slightly. Defect 4
The face resembles a small tamarind fruit. Defect 5
Both ears are present, though in some pieces they are indistinct. Defect 6
At the curve where the upper arm meets the shoulder, the right shoulder is thicker than the left. Defect 7
The Buddha's left knee protrudes higher than the first base layer. Defect 8
The right knee protrudes lower than the first base layer. Defect 9
The Buddha figure tilts slightly to the right, while the three base layers tilt slightly to the left, alternating with the figure's tilt. Defect 10
The walls between the three base layers vary in height: between the first and second base layers, the wall is level with the floor; between the Buddha's lap and first base and between the second and third bases, the walls are higher than the Buddha's floor. Defect 11
The floor outside the arch is slightly higher than inside, making the line almost invisible unless viewed at an angle. Additional defects
For sub-print 2, the chest V print:
Defect 12Between the Buddha's lap (thighs) and arms, there is a raised flesh area clearly showing the lap, especially from the knee up to the arms (forming a V shape).Defect 13
Both arms spread wider than in sub-print 1 (similar to sub-prints 3 and 4). Defect 14
The Buddha's hair is longer than in sub-print 1 (similar to sub-print 3). Defect 15
The uppermost base layer is longer than in sub-print 1. For more details, visit the Facebook page
"Somdej Buddha Science" by Pol. Lt. Col. Komsan Sanongpong. Special thanks to Assistant Professor Rangsarn Tosuwan for kindly providing images of another master Wat Rakang Somdej Buddha for educational purposes, and thanks to the current owner of this highly beautiful, well-preserved Large Print sub-print 2 (chest V print) Wat Rakang Somdej Buddha. Nirunam divides into four sub-prints; sub-prints 1 and 3 are very rare, most are sub-print 2, and sub-print 4 is somewhat common but less than sub-print 2. Nirunam notes that careful observation reveals the 'Saem' line beneath the lap as well.
This piece shows no crackling (which often occurs in thick, lacquered pieces), has brown color with edges close to the frame line, and displays all three key authentic Somdej Buddha features: granules, worm trails, and needle pores. The print style matches the text, with faint 'Saem' lines beneath the lap and above the lion base. The back is smooth with wrinkles and visible cracking along edges, showing traces of mold insect activity and what appears to be 'nam tan eew' (a type of resin). This is an excellent prototype for studying Wat Rakang Somdej Buddha. More articles can be read in the "Science of Somdej Buddha" column. Author Pol. Lt. Col. Komsan Sanongpong, former forensic police officer.Facebook page–Somdej Buddha ScienceRead the "Science of Somdej Buddha" column